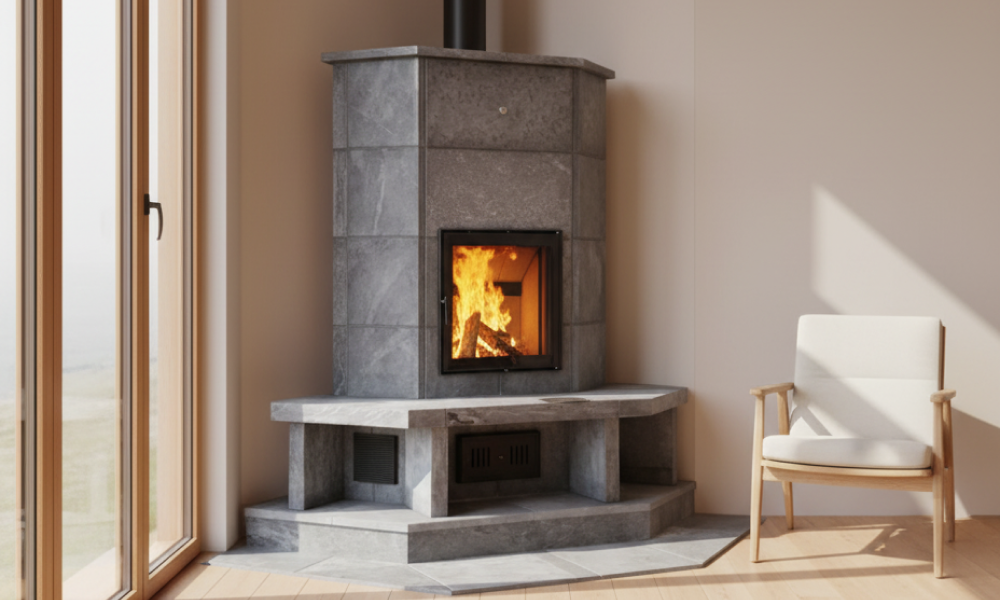
Masonry heaters represent a significant investment in home comfort and efficiency, providing decades of reliable heating when used properly. Yet many new owners make avoidable mistakes during their first heating season that reduce performance, increase maintenance needs, or create unnecessary frustration. Understanding how masonry heaters work reveals they operate fundamentally differently from conventional wood stoves, and applying wood stove habits to masonry heating creates problems. Learning from common mistakes helps new owners master their systems quickly while avoiding the pitfalls that complicate the experience for those who don’t understand the technology’s unique requirements.
The most common masonry heater mistake is treating it like a conventional wood stove by maintaining slow-burning fires all day, when optimal performance requires hot, fast burns that charge the thermal mass completely in 2-4 hours. Many new owners also burn wet or unseasoned wood, which prevents proper combustion and creates excessive creosote buildup throughout the system. Understanding these mistakes before they happen allows masonry heater owners to achieve optimal performance from their first fire, avoiding the learning curve complications that reduce satisfaction and efficiency.
New masonry heater owners who learn proper operation from the start experience 90% fewer performance issues and achieve optimal comfort within the first month, compared to those who apply conventional wood stove techniques incorrectly.
Mistake #1: Using Wet or Unseasoned Firewood
The single most damaging mistake masonry heater owners make is burning wet, green, or inadequately seasoned wood. While this creates problems in any wood-burning device, it particularly undermines masonry heater performance because the high-temperature combustion these systems require cannot be achieved when substantial heat energy must first evaporate water from wood before actual burning begins.
Wet wood produces excessive smoke, creates creosote throughout the system, prevents proper heat transfer to thermal mass, and wastes fuel that should be heating your home. Even wood that seems dry after sitting in a garage for months may contain 30-40% moisture, far above the 20% maximum necessary for optimal performance. Wood at 15% moisture or less burns cleanest and produces maximum heat, ensuring your masonry heater operates as designed.
Solutions for Proper Wood Seasoning:
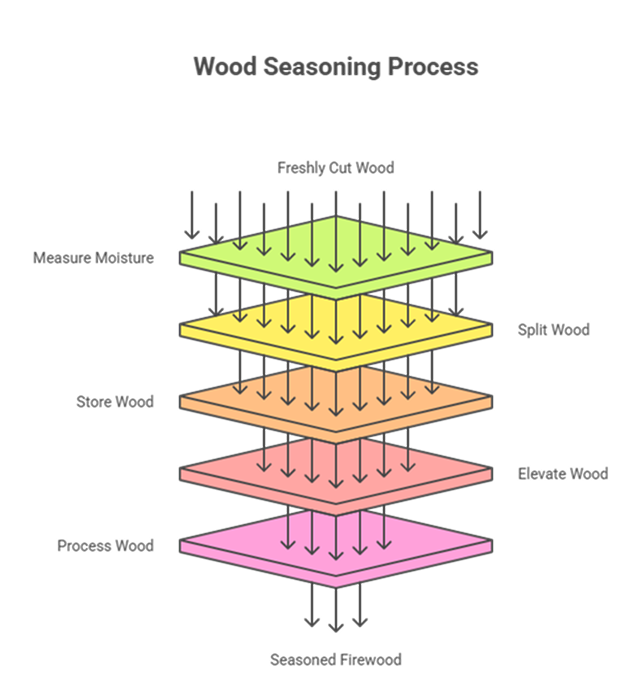
- Invest in a moisture meter ($20-40) and test wood before burning
- Split pieces and measure internal moisture, not just surface
- Store wood in covered, well-ventilated locations with sun and wind exposure
- Elevate stacks on pallets to prevent ground moisture absorption
- Cover only the top of stacks, leaving sides open for air circulation
- Process wood a full TWO-years before burning to allow proper drying time
Refuse to burn anything above 20% moisture regardless of how desperate you feel for heat. Using properly seasoned wood from the beginning establishes correct system performance and avoids the creosote buildup and efficiency problems wet wood creates. Plan ahead by maintaining a two-year rotation where this year’s processed wood seasons while you burn wood from the previous year.
Mistake #2: Building Slow, Smoldering Fires
New masonry heater owners often bring conventional wood stove habits to their new system, attempting to build fires that burn slowly all day. This represents fundamental misunderstanding of how thermal mass heating works and creates multiple problems including incomplete combustion, excessive smoke production, and failure to charge the thermal mass properly.
Understanding how masonry heaters work reveals they’re designed for exactly the opposite approach: fast, intensely hot fires that burn completely in 2-4 hours. During this short burn, the fire should be vigorous with active flames throughout, achieving temperatures exceeding 1,200°F. The goal is maximum temperature, complete combustion, and thorough heat transfer to thermal mass that will radiate warmth for the next 18-24 hours.
Proper Firing Technique:
- Use the top-down fire method with kindling and fire starter on top
- Maintain fully open air supply throughout the entire burn
- Never damper down or restrict air to extend burn time
- Let each fire burn completely down to ash
- Build fires that last 2-4 hours, not all-day burns
- Load all wood at once; never reload during active burning
Build fires using progressively smaller wood as you build upward, placing kindling and fire starter on top. Light from above and maintain fully open air supply throughout the entire burn. The vigorous combustion with plenty of oxygen produces the clean, hot burning that masonry heaters require, capturing maximum heat in thermal mass rather than sending it up the chimney as smoke.
Mistake #3: Overloading or Underloading the Firebox
Correctly sizing your masonry heater during design ensures the firebox matches your home’s heating needs, but improper loading undermines even perfect sizing. Overloading creates fires too large for proper air circulation and complete combustion, producing smoke and inefficiency while potentially overheating your home. Underloading wastes the thermal mass’s capacity, requiring more frequent fires than necessary and failing to maintain comfortable temperatures throughout daily cycles.
Learn the appropriate wood quantity for your specific heater and conditions through careful observation and adjustment. Start conservatively with smaller fires and observe results over several days. If your home doesn’t reach comfortable temperatures or the thermal mass cools too quickly, gradually increase wood quantities in subsequent fires. Most heaters have an optimal range of 25-40 pounds of wood per fire depending on size, design, and outdoor temperature conditions.
Loading Best Practices:
- Start with conservative amounts and adjust based on results
- Split wood to 4-6 inch diameter for optimal burning
- Maintain consistency in piece sizing for predictable burns
- Load all wood at the beginning; never reload during burning
- Adjust quantities between fires, not during active combustion
- Account for outdoor temperature when determining load size
Piece size matters as much as total quantity for achieving optimal performance. Split wood to 4-6 inch diameter for complete burning during the limited firing period. Larger unsplit rounds don’t burn completely and waste potential heat, while pieces split too small burn too quickly without producing sustained high temperatures necessary for proper thermal mass charging.
Mistake #4: Neglecting Annual Chimney Maintenance
The clean burning of properly operated masonry heaters produces minimal creosote compared to conventional wood stoves, leading some owners to assume maintenance isn’t necessary. This dangerous misconception can lead to chimney fires, carbon monoxide problems from blocked flues, or undetected structural issues that compromise safety and performance over time.
Schedule professional chimney inspection and cleaning every year before the heating season begins, typically in early fall. Even with minimal deposits from clean burning, the annual inspection identifies developing problems like mortar deterioration, chimney cap damage, liner cracks, or blockages from bird nests and debris. The modest annual cost of $150-250 provides essential safety assurance and often catches small problems before they become expensive repairs requiring major intervention.
Annual Maintenance Checklist:
- Professional chimney inspection and cleaning before heating season
- Visual inspection of accessible chimney areas for damage
- Chimney cap examination for damage or debris blockage
- Firebox inspection for cracks or deterioration
- Door gasket testing and replacement if needed
- Documentation of maintenance for warranty and records
Between professional cleanings, periodically inspect visible portions of your chimney for signs of problems throughout the heating season. Look for moisture stains indicating water intrusion, efflorescence on exterior masonry, or visible damage to chimney structure. Check the chimney cap for damage or blockage, and address any concerns immediately rather than waiting until the next scheduled inspection.
Mistake #5: Using Inappropriate Fuel and Materials
Masonry heaters are designed exclusively for natural cordwood, not manufactured fuels, treated wood, construction waste, or garbage. Never burn pressure-treated lumber, painted wood, plywood, particleboard, or construction debris in your masonry heater. These materials release toxic chemicals during combustion that damage refractory materials, contaminate indoor air, create hazardous chimney deposits, and void warranties on your heating system.
Similarly, avoid manufactured fire logs, wax-based starters beyond initial ignition, or chemical accelerants that can damage components and produce unpleasant or dangerous fumes. While natural fire starters like newspaper, cardboard, or fatwood work fine for ignition, chemical starters can damage refractory materials and compromise the clean-burning performance that makes masonry heaters superior to conventional wood heating.
Acceptable and Unacceptable Fuels:
- ✓ Natural seasoned cordwood (hardwood or softwood)
- ✓ Natural fire starters (newspaper, cardboard, fatwood)
- ✓ Recognized firewood species properly seasoned
- ✗ Pressure-treated or painted lumber
- ✗ Construction waste, plywood, particleboard
- ✗ Manufactured fire logs or chemical accelerants
- ✗ Garbage, plastic, or contaminated materials
Stick to natural cordwood from recognized firewood species, properly seasoned and free from paint, treatment, or contamination. Dense hardwoods like oak, maple, and ash provide excellent heat output and long-lasting coals. Softwoods like pine or fir burn faster but work fine in masonry heaters despite myths suggesting otherwise, as long as they’re properly seasoned to below 20% moisture content.
Mistake #6: Misunderstanding the Curing Period
New masonry heaters require a proper curing period before full operation, typically one to two weeks of progressively larger fires that allow materials to dry and strengthen gradually. Rushing this critical process by building large fires immediately risks cracking the mortar, damaging refractory components, or causing thermal stress that affects performance for the system’s entire lifespan.
Follow the installer’s specific curing schedule carefully, gradually increasing fire size over multiple burns rather than rushing to full capacity. Start with small kindling fires producing minimal heat, then progressively add more wood with each subsequent fire over the one to two week period. This patient approach allows moisture in mortar and materials to evaporate gradually while the system adapts to thermal stresses without damage.
Proper Curing Schedule:
- Week 1, Day 1-2: Small kindling fires only
- Week 1, Day 3-4: Add small splits to kindling
- Week 1, Day 5-7: Gradually increase to half-size fires
- Week 2, Day 1-4: Three-quarter size fires
- Week 2, Day 5-7: Full-size fires as recommended
- Monitor for any unusual sounds, smells, or visible issues
Even after the initial curing period, the first heating season represents a learning period where you discover your heater’s specific characteristics and optimal operating patterns for your home and climate. Every home, climate, and heater combination behaves slightly differently, requiring observation and adjustment. Approach the first winter with curiosity and willingness to learn rather than frustration if immediate perfection doesn’t occur.
Mistake #7: Expecting Conventional Wood Stove Behavior
Perhaps the most fundamental mistake is expecting masonry heaters to behave like conventional wood stoves, leading to disappointment and improper operation. Masonry heaters don’t provide immediate intense heat when you light a fire. They don’t require constant tending throughout the day. They don’t produce hot surfaces that radiate intense concentrated warmth. Understanding these differences prevents disappointment and allows appreciation of masonry heater advantages that represent improvements, not limitations.
The gentle, even warmth that develops over hours and persists long after fires die represents superior comfort for those who adjust expectations appropriately. The single daily fire that heats all day and night means freedom from constant attention and midnight wood runs. The moderate surface temperatures of 140-200°F provide safety impossible with conventional stoves reaching 500°F, making them family-friendly for homes with children and pets.
Key Behavioral Differences:
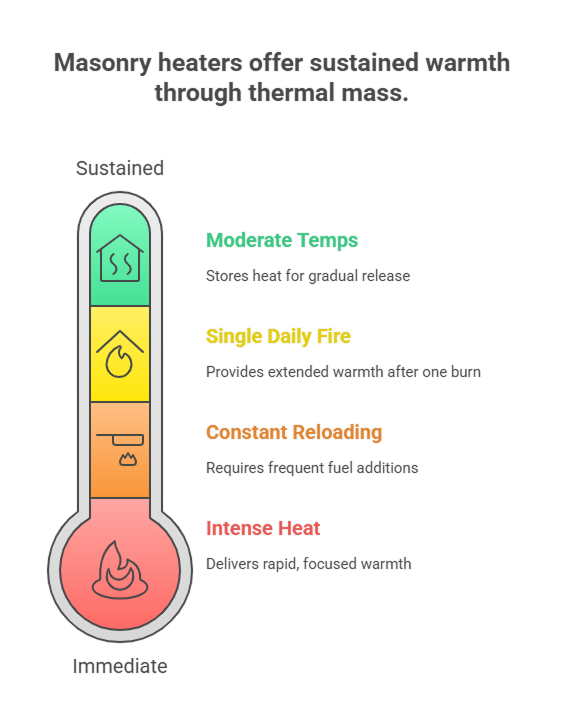
- Gentle radiant warmth vs. intense concentrated heat
- Single daily fire vs. constant tending and reloading
- 2-4 hour burn providing 18-24 hours warmth
- Moderate surface temps vs. dangerously hot metal
- Batch burning vs. continuous combustion
- Thermal mass storage vs. immediate heat output
Allow yourself time to adjust mentally and practically to a completely different heating experience that prioritizes consistent comfort over immediate heat. The first few weeks might feel uncertain as you learn firing techniques, load sizing, and temperature patterns specific to your system and home. By mid-winter, most owners wonder how they tolerated conventional heating’s temperature swings, constant attention demands, and inferior comfort levels.
Mistake #8: Inadequate Wood Storage and Planning
Even with dramatically reduced fuel consumption compared to conventional wood stoves, inadequate wood storage creates ongoing problems that undermine the masonry heater experience. Improperly stored wood doesn’t season effectively regardless of time, leading back to wet wood problems. Insufficient quantity creates anxiety about running out mid-winter, sometimes leading to burning inadequately seasoned wood from desperation or emergency purchases at premium prices.
Plan wood storage for at least two years’ supply, allowing wood cut this year to season thoroughly for use next year while burning wood processed previously. This rotation ensures consistently dry fuel while eliminating pressure to burn fresh wood before it’s ready. Calculate your actual consumption through your first heating season, typically 1-3 cords depending on home size and climate, then establish processing and storage systems that comfortably exceed those needs.
Effective Wood Storage Strategy:
- Plan for minimum two-year rotation supply
- Create covered storage with three sides and roof
- Elevate wood on pallets to prevent ground moisture
- Position storage conveniently near home entrance
- Allow sun and wind exposure for continued drying
- Calculate actual consumption and plan accordingly
- Process wood 18-24 months before burning
Create covered storage that protects from precipitation while allowing air circulation through simple three-sided sheds with roofs. Avoid fully enclosed spaces like garages that trap moisture and prevent proper seasoning despite protecting from weather. Location matters significantly for convenience; place storage near your home’s entrance to minimize the effort of daily wood retrieval during winter weather when paths may be snowy or icy.
Mistake #9: Ignoring Ash Removal and Firebox Maintenance
While masonry heaters produce far less ash than conventional wood stoves due to complete combustion, accumulated ash still requires periodic removal for optimal performance. Allowing ash to build up excessively restricts airflow underneath burning wood, interfering with combustion efficiency and preventing the vigorous burning necessary for proper thermal mass charging.
The small ash drawer or firebox ash dump needs emptying when ash accumulates to within 2-3 inches of the grate or air inlet. Some users maintain a thin ash bed of about an inch, believing it improves combustion by insulating the firebox floor and reflecting heat upward. This practice works fine as long as excessive accumulation doesn’t occur that would restrict airflow or make door closure difficult.
Ash Removal Best Practices:
- Empty when ash reaches 2-3 inches from grate
- Wait 24 hours after last fire for complete cooling
- Use metal containers with tight-fitting lids
- Store ash containers outdoors away from structures
- Dispose of ash properly after confirming it’s completely cold
- Never vacuum hot ash; use shovel and metal bucket only
Always ensure ash has cooled completely, typically 24 hours minimum after the last fire, before removal and disposal to prevent fire hazards. Store removed ash in metal containers with tight-fitting lids, kept outdoors away from combustible materials and structures. Ash can contain hidden embers that remain hot for surprisingly long periods, creating serious fire hazards if disposed of carelessly in plastic bags or near combustible materials.
Mistake #10: Reloading During Active Burns
Conventional wood stove owners constantly reload their fireboxes throughout the day, adding wood whenever flames die down or temperatures drop. This ingrained habit applied to masonry heaters disrupts optimal operation and reduces efficiency significantly. Each time you open the firebox door during active burning, you release heat that should be transferring to thermal mass, introduce cold air that temporarily lowers combustion temperatures, and disrupt the combustion dynamics necessary for complete burning.
Load all the wood you intend to burn at the beginning, build the fire properly using top-down method, close the door, and leave it alone until the fire burns completely down to ash. This batch-burning approach allows the fire to develop maximum temperature quickly and maintain it consistently throughout the 2-4 hour burn period. The uninterrupted burning ensures complete combustion of both solid wood and volatile gases, optimal heat transfer to thermal mass, and minimal emissions.
Batch Burning Discipline:
- Load all wood at fire start; plan quantity carefully
- Close door and don’t open until fire burns to ash
- If fires consistently insufficient, increase initial load
- If fires too intense, reduce next fire’s initial load
- Adjustments happen between fires, never during burning
- Trust the thermal mass to radiate heat long after flames die
If you consistently find fires insufficient to maintain comfortable temperatures throughout daily cycles, increase the initial load rather than reloading partway through active burns. If fires become too intense and overheat your home, reduce the initial load for subsequent fires. All adjustments should happen between fires based on observed results, not during active combustion. The discipline to load once and walk away takes adjustment for wood stove veterans but proves essential for optimal masonry heater performance and longevity.
Learning from Mistakes and Achieving Mastery
Most masonry heater owners make at least some of these mistakes during their first heating season, and that’s completely normal when transitioning to fundamentally different heating technology. The key is recognizing problems quickly through observation, understanding their causes through education, and adjusting practices accordingly based on proper technique. The forgiving nature of well-designed masonry heaters means most mistakes create temporary inconvenience rather than permanent damage, providing valuable learning opportunities without harsh consequences or expensive repairs.
Understanding how masonry heaters work and consciously avoiding these common mistakes ensures optimal performance from the beginning of your ownership experience. The investment in proper operation techniques and quality fuel pays dividends throughout the system’s multi-decade lifespan through superior comfort, minimal maintenance requirements, maximum efficiency, and the deep satisfaction of mastering elegant heating technology that connects you to centuries of proven thermal mass heating principles.
Ready to learn more about optimal masonry heater operation and avoiding the mistakes that complicate new owners’ experiences during their first heating season? Contact our team for comprehensive owner education, expert guidance on getting maximum performance from your masonry heater, or to discuss how professionally designed systems combined with thorough training set you up for success and satisfaction from your very first fire.
Frequently Asked Questions (FAQs)
How long should a fire burn in a masonry heater?
2-4 hours at high temperature with active flames. This charges the thermal mass to provide 18-24 hours of radiant heat.
What moisture content should firewood be?
Below 20% moisture content, ideally 15% or less. Use a moisture meter to test before burning.
How much wood does a masonry heater use per fire?
Typically 25-45 pounds per fire, depending on heater size and outdoor temperature. Most homes need only 1-3 cords annually.
Can I reload wood during a fire?
No. Load all wood at the start, close the door, and let it burn completely down to ash without reloading.
How often should I clean the chimney?
Annually before each heating season. Professional cleaning typically costs $150-250.
What if my fires are too small or too large?
Too small won’t heat adequately. Too large wastes fuel and overheats. Adjust quantities between fires based on results.
Leave a Reply